Advance Git & GitHub for DevOps Engineers
#90daysofDevOps Day-13

Today, we’ll explore how to manage changes and branches in Git, essential skills for DevOps engineers. By mastering these concepts, you’ll be able to control versions of your code, organize development, and keep your repository clean.
Git Branching: Developing Features Without Mixing Things Up
Branches in Git are like isolated workspaces, allowing you to work on different versions of your project simultaneously. Think of each branch as a separate task or feature (unique line of development) where you can work without affecting the main code.
Why use branches? Let’s say you’re adding a new feature or fixing a bug. Instead of making these changes directly in the main code, you create a new branch. This way, you can test and make mistakes without affecting the main project.
Let’s explore some typical branches:
Master Branch: The main branch that stores the stable and released code.
Develop Branch: A branch where ongoing development happens before merging into the main release.
Release Branch: A branch for preparing new releases, typically created from the
developbranch. When a release is stable, it merges back intomaster.Feature Branch: Isolated branches for developing new features. Each feature is developed independently and then merged into
develop.Hotfix Branch: A branch for emergency fixes on
master. Once resolved, it’s merged back into bothmasteranddevelop.
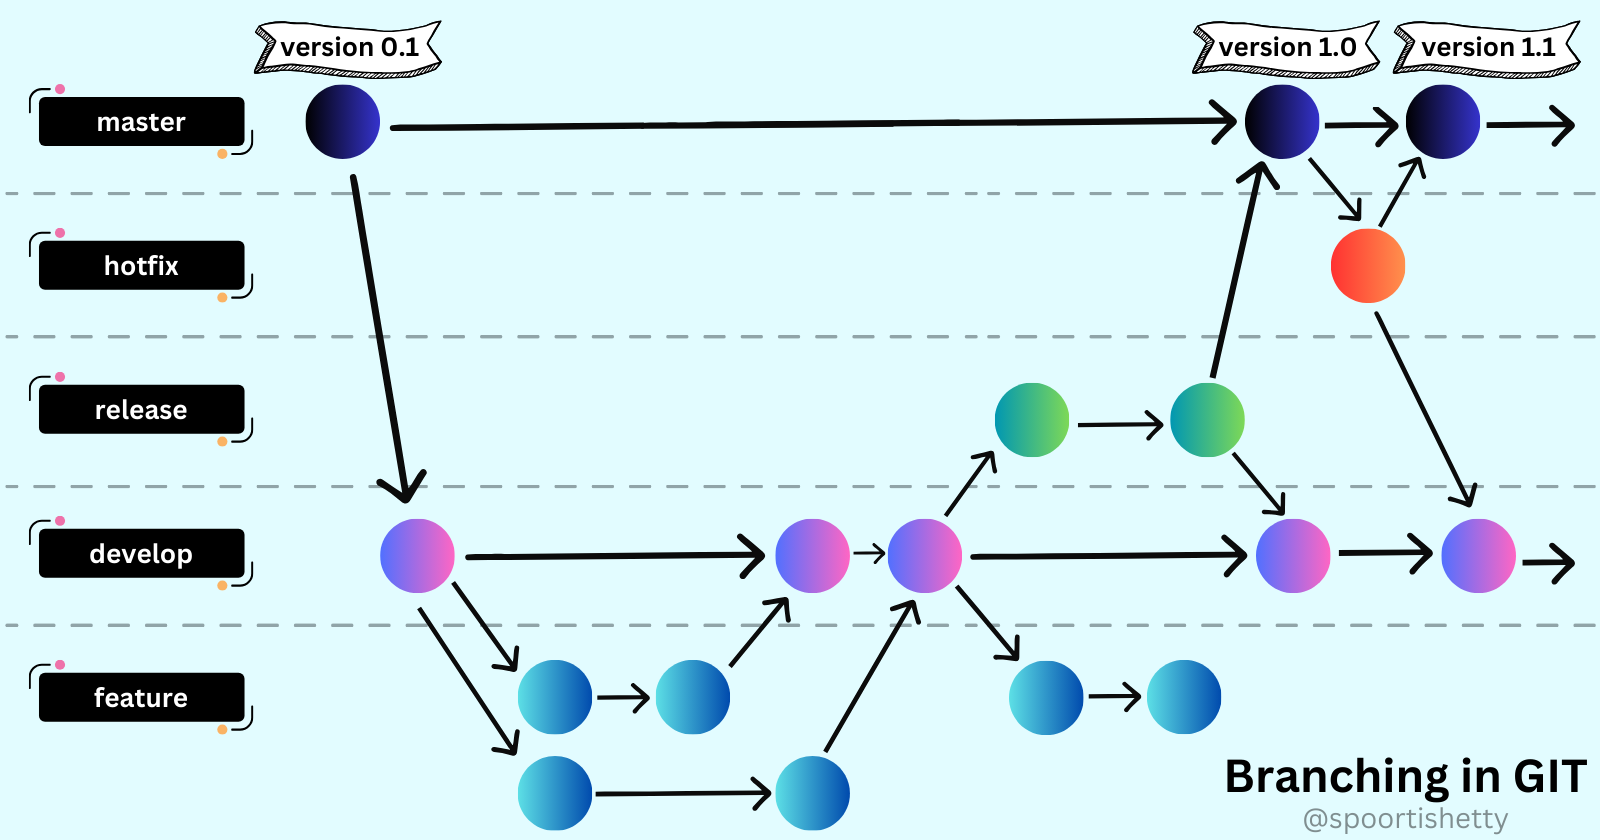
The diagram above visualizes these branches, showing how development flows from feature branches to develop, then through release, and finally into master.
Creating and Working with Branches
Imagine you’re working on a feature called “version01”:
Create a New Branch:
git checkout -b devHere,
devis the name of the new branch for developing features.Add Your Feature: Let’s add a file called
version01.txtand write:echo "This is the first feature of our application" > Devops/Git/version01.txtSave Your Work:
First, stage it:
git add Devops/Git/version01.txtThen, commit with a message:
git commit -m "Added new feature"
Push the Branch to GitHub:
git push origin devNow your new feature is safe on GitHub in the
devbranch, without changing the main code.
Git Reset and Git Revert: Fixing Mistakes
Mistakes happen! Git offers two main commands to help: reset and revert.
Git Reset: Think of this as “undo” for your local changes. However, it can remove changes in a way that isn’t recoverable if you push it. Only use it if you’re sure.
git resetis used to move the current branch to a specified state. It allows you to remove commits and changes from your working history in three primary modes:Soft Reset: Moves the branch pointer to an earlier commit but leaves all your changes staged.
git reset --soft HEAD~1Use this if you want to keep the changes staged and ready for a different commit.
Mixed Reset (default): Moves the branch pointer to an earlier commit and unstages the changes. The modifications remain in your working directory but are no longer in the staging area.
git reset --mixed HEAD~1Mixed reset is perfect when you want to make adjustments to staged files without completely discarding them.
Hard Reset: Moves the branch pointer and discards all changes from both the staging area and working directory.
git reset --hard HEAD~1This permanently removes changes, making it difficult to recover them. Hard reset is usually reserved for local cleanup.
Git Revert: This is a safer way to “undo” changes without removing them from the history.
Unlike reset,
git revertis ideal for shared repositories because it preserves the commit history. It creates a new commit that cancels out the changes of a specified commit without deleting it.Revert a Single Commit:
git revert <commit-hash>This will create a new commit that undoes the specified changes. This is safe for shared projects as it does not rewrite history.
Revert Multiple Commits:
git revert HEAD~2..HEADThis reverts the last two commits and creates new commits that cancel them.
Using git revert is highly effective for fixing errors in a shared repository without risking conflicts from altering commit history.
Task: Undoing Unwanted Changes
Suppose you’ve added a few lines that aren’t needed:
Add Extra Content:
 echo "This is a bug fix in the development branch" >> Devops/Git/version01.txt
 git commit -am "Bug fix in dev branch"
Oops! Let’s Undo Last Few Changes: Use
git revertto undo changes:git revert HEAD~2This removes the last two changes without deleting the history.
Git Cherry-Pick: Selectively Apply Commits Across Branches
git cherry-pick is perfect when you want to copy specific commits from one branch to another without merging all changes. This allows you to apply only desired changes without affecting the entire branch.
Cherry-Picking a Single Commit:
git cherry-pick <commit-hash>After identifying the commit hash from
git log, cherry-pick lets you bring only that commit to your current branch.Cherry-Picking Multiple Commits:
git cherry-pick <commit-hash1> <commit-hash2>Or, specify a range of commits:
git cherry-pick <start-commit-hash>^..<end-commit-hash>
This approach allows selective inclusion of changes, making it useful for backporting features or bug fixes across branches.
Git Rebase and Merge: Combining Changes in Different Ways
Git Merge and Git Rebase help combine changes, but they do it differently.
Git Merge: Merges branches together without altering commit history. It shows each branch’s changes as they happened.
Git Rebase: Rewrites commit history so that changes appear in a straight line. This makes the history look cleaner.
Practical Task: Merging and Rebasing
Let’s say you’re ready to combine changes from your dev branch with the master branch.
Create Branches:
 git branch feature1
 git branch feature2
To see your branches:
git branch -aMerge the
devBranch withmaster: Go to themasterbranch, then merge the changes fromdev:git checkout master git merge devThis will keep both branches’ commit history, showing all changes.
Practice Rebase: If you want a cleaner history:
 git checkout feature1
 git rebase master
This reapplies all commits from
feature1ontomaster, making the history look cleaner.
Merge Conflicts: Resolving Development Collisions
Merge conflicts occur when Git can’t automatically reconcile changes. This happens when two branches edit the same lines or files.
Example Scenario: Resolving Merge Conflicts
Simulate a Conflict:
- Edit
file.txtin bothdevandfeaturebranches and commit the changes.
- Edit
Merge with Conflict:
Switch to
featureand mergedev:git checkout feature git merge dev
Resolve the Conflict:
Git will indicate the files in conflict. Open each file to see markers like
<<<<<<< HEADand>>>>>>> dev.Edit to choose which changes to keep, then save the file.
Mark the Conflict as Resolved:
git add file.txtComplete the Merge:
git commit -m "Resolved merge conflict"
Real-World Issue: Remote Branch Conflicts
When working with Git, you might face situations where your local branch and remote branch are not in sync. For example, if your local branch is master and your remote is main.
Fixing Branch Sync Issues
Fetch the Remote Branch:
git fetch origin mainRebase the Local Branch:
git rebase origin/mainPush the Changes:
git push -u origin master:main
This sequence fetches updates from the remote branch (main), rebases your local branch on top of it, and then pushes your local branch to the remote.
Git Stash: Saving Unfinished Work Temporarily
Stashing allows you to save uncommitted changes without committing them, which is helpful if you need to switch branches quickly.
Example: Using Git Stash
Stash Changes:
git stashSwitch Branches and Work:
- You can switch branches and work without losing your stashed changes.
Retrieve Your Stashed Changes:
git stash apply
Key Takeaways for Advanced Git Usage
Branches Are Essential: Branches keep changes isolated and make collaboration easier.
Reset vs. Revert: Use
resetfor local changes you’re sure about, andrevertto safely undo changes in shared projects.Cherry-Pick for Selective Commits: Use cherry-pick to move specific commits to other branches without merging everything.
Rebase for a Clean History: Use rebase to streamline commit history when integrating branches.
Merge Conflicts: Resolve conflicts by editing files, adding resolved changes, and committing.
Dealing with Branch Conflicts: Fetch, rebase, and push to keep local and remote branches in sync.
Stash Changes: Use
stashto save unfinished work temporarily, letting you switch tasks without committing.
With these skills, you can manage code changes with confidence and keep your Git history clean!